Take a photograph of a nearby flower and the background may turn into soft patches of color. Focus on something farther away and the flower may become blurry instead. The camera is deciding where light needs to come together to make a sharp image.
To see the idea, start with just one tiny point on an object. Light from that point spreads in many directions. Some enters the lens. A converging lens bends those rays so that, for a suitable object distance, they meet again on the other side. A camera can record a sharp image of that point when the meeting place falls on its sensor.
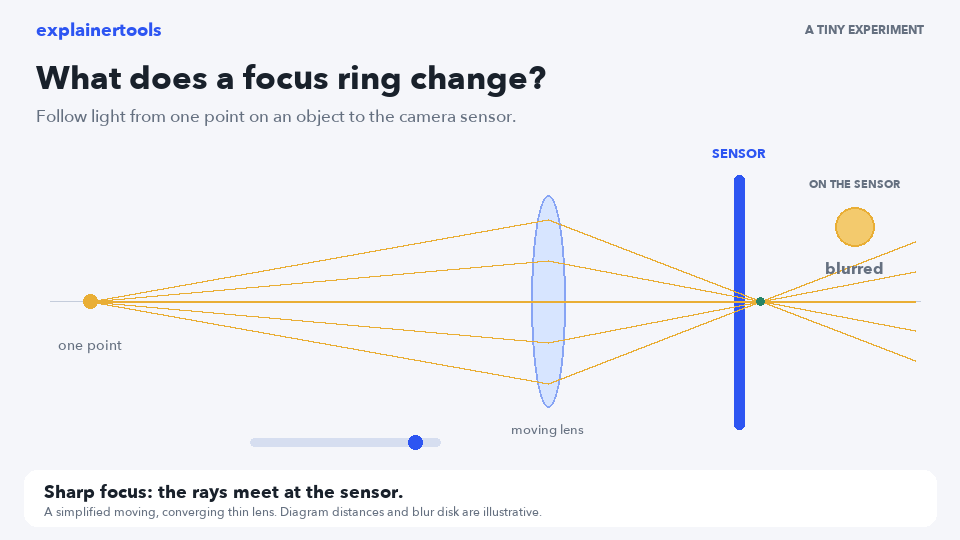
Watch the meeting place
In the experiment, the object point and sensor stay in place while the lens moves. Follow the gold rays. When they cross at the blue sensor line, the small sensor view shows a tight point. When they cross in front of or behind the sensor, the sensor cuts through a wider bundle of light. A point in the scene then spreads into a blur.
The thin-lens equation connects object distance, image distance, and focal length. It is a useful approximation for understanding this relationship, even though real camera lenses contain several shaped elements and can focus by moving internal groups. Our animation isolates the geometry of a single converging lens. OpenStax: Image Formation by Lenses.
Make one prediction
Ask your child to move the lens until the point looks sharp. Then ask: if the lens moves a little farther, will the dot stay small? Let them try. Move back across the sharp position and compare the two sides. Both can produce blur, although the rays meet on different sides of the sensor.
You can make the conversation concrete without introducing an equation. Point to the object, the lens, and the sensor in order. Ask your child to trace one ray with a finger. Then follow another ray from the same object point. Where do they meet?
Why can one part of a scene be sharp while another is soft?
Points at different distances generally need different image distances to come into exact focus. A normal camera setting therefore gives one object distance the sharpest focus. Objects a little nearer or farther may still look acceptably sharp; farther away from that focus distance, the blur becomes easier to notice. Ryan Sael's explainer makes this visible as a plane moving through a miniature landscape. Explore The Plane of Focus.
Try its foreground and background controls. Look at a tree, then the cabin behind it. Ask which becomes sharper when you change the focus. The point of the exercise is to connect the setting with a visible consequence, rather than to find a setting that makes every photograph look the same.
Aperture changes how much looks sharp
The aperture is the opening through which light enters the lens. With other relevant settings held constant, a smaller opening generally increases depth of field: the range that appears acceptably sharp. A larger opening generally makes that range shallower. F-numbers run in the opposite direction to opening size, so f/2 describes a larger opening than f/8 for the same focal length. Nikon: Understanding Maximum Aperture.
Focus and aperture are different controls. Focus selects the distance of best sharpness. Aperture influences how quickly blur grows away from that distance, while also changing the light admitted. Our small experiment demonstrates focus only; use Sael's larger model to explore aperture next.
Finish by finding a photograph with a sharp subject and a soft background. Ask what the photographer wanted you to notice. A technical idea has become a way to read an everyday picture.
Sources & further reading
Make the next question an experiment.
Browse independent creators who make big ideas visible.
Find an explainer